
This article contains affiliate links. If you buy through them, we may earn a commission at no extra cost to you.

TL;DR: Luminar Mobile Review
- The good: Responsive, enjoyable to use, and packs genuinely useful tools like Light Depth and Sky Replacement into a pocket-sized app.
- Needs work: Some lag on AI features , no horizontal editing, and portrait tools lack eye-masking.
- Pricing: A $49.99 lifetime plan is excellent value, with a seven-day free trial to test it out first.
Who’s it for? Dedicated smartphone photographers and enthusiasts who enjoy cross platform editing.
I’ve been testing Luminar Mobile for some time now, analyzing how well it performs routine and advanced editing tasks. I’ll say now, the app offers a unique approach when it comes to its usability, with some things working very well, and other areas needing improvement. I’ll share my testing feedback, what the app does and how you can get the most out of it.
I’ve been using Luminar Mobile on my iPhone 13 – a five-year-old device with an aging A15 Bionic chip. To really test Luminar Mobile, I edited a mix of RAW files from my Fujifilm X-T3 and shots I took on my smartphone. The app is also designed for tablets, so for those who like that workflow, keep reading to see how the full RAW editing experience holds up.
Luminar Mobile Pros & Cons
Pros
- Responsive tools and features
- Unique and enjoyable user interface
- Excellent single-click features
- Affordable lifetime plan
Cons
- Some lag on AI features
- Can’t edit in horizontal mode
- Portrait tools lack eye masking
Related: I Tested the Best Photo Editing Apps for iOS and Android (2026)
Luminar Mobile vs Luminar Desktop
Although many features crossover, the mobile and desktop app are not like for like. Luminar Mobile – which is available for both iOS and Android – has a completely different user experience, in some cases opting for knob dials, rather than traditional sliders.
The mobile app also misses out on some of the desktop app’s key features, such as the AI Assistant, advanced noise reduction and image upscaling.
However, it does crossover some of my favorite features like the Light Depth tool, Sky Replacement and Structure AI, and I’ll cover how well they perform when I cover my real-world testing.
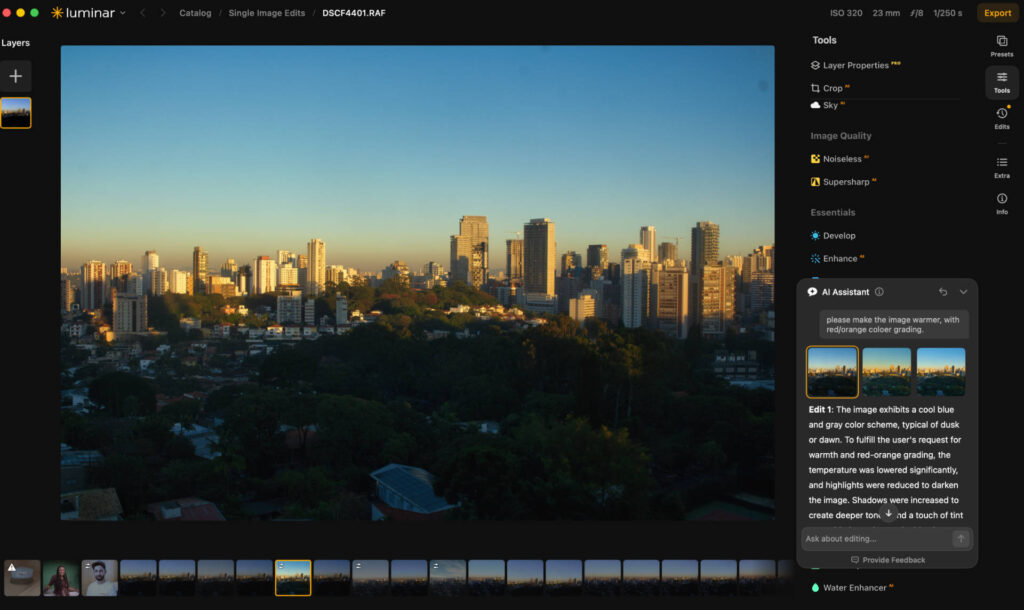
An example of Luminar for desktop.
One cool thing about the mobile app is its cloud-sync functionality. I can start editing on Luminar Mobile, and continue the edit on the desktop app when I want to switch to my Macbook. Oddly, it doesn’t work in reverse, meaning if you start the edit on your desktop, it won’t sync to mobile, something I hope is fixed in future updates.
If you’d like to learn more about the desktop version, you can do so in my detailed Luminar Desktop review.
Editing RAW Files on Luminar Mobile
I imported one of my RAW files, to see how the app handles large 60MB images. It imported very quickly, and it opened up without any lag whatsoever. Zooming in and out of the frame to check detail was very smooth, I’d even say it felt marginally smoother than the desktop app. Which is interesting as the iPhone is quite old and my Mac is a 2026 M5-chip model.
Using Light Depth
The Light Depth tool allows you to reposition where light falls within a frame. It’s useful if you’ve taken a compelling subject, but the light falls on a different part of the frame.
I used the RAW file below specifically because the building in the centre of the frame isn’t getting the light I wanted due to it being blocked by the surrounding buildings. This leaves it underexposed and not having the powerful impact I desire.
Orginal RAW file…

Simply selecting Light Depth, scrolling its position and increasing its intensity, completely changed the dynamic of the shot. I would say I had to push the intensity right up to 100 to see a noticeable difference, more sensitive and granular functionality would be great in future updates.

After getting the Light Depth exactly where I wanted it, I continued with the rest of the edit – it’s here where I will save you some. That’s because I noticed when applying a preset for example, it changed the impact of light depth and I had to do it again. My advice is to do all your other edits first and save changing the depth of light to the end.
Sky Replacement
The Sky Replacement tool does exactly what it says on the tin; it lets you swap out your current sky for a totally new one. I like using the feature on dull gray days, or when the sky feels flat and lacks character.
There are plenty of options available (30 to be exact), with some adding subtle differences, and others really pushing creative boundaries. You have everything from cloud blue skies, warm, rich sunsets, through to milky-way like options. I find some of them a little too unrealistic, but the cloudy and sunset options are certainly great for adding some drama to the shot.
Below are some examples of what’s available…


Replacing the sky was straightforward enough, requiring a single click and giving an immediate response, however, I did walk into some struggles when making some manual adjustments.
I noticed some lag when adjusting the position of the sky, it stuttered and required some patience on my part to get it right. This could be a flaw in the app, or because I’m running it on an older device – either way, it’s worth knowing if you’re also working with older hardware.
There’s also another section designed to “close gaps” and “fix details.” Honestly, I’m not sure what they do because when I moved the sliders, there were zero changes made to the shot.

Other sky adjustment tools such as editing white balance, exposure and focus all worked as advertised, all offering subtle but impactful changes to the overall look and feel.
Press play for a before and after of my Luminar Mobile RAW file edit…
Final RAW edit photo…

Object Removal
Object removal is all the rage in the world of photo editing apps. In all my testing, Lightroom is the gold standard, so I was curious to see how well Luminar Mobile did in this department.
Related: Luminar Neo vs Lightroom: Honest Comparison Before You Decide
Opening up another image, I used the removal tool to take out a boat in the frame. While not on a par with Lightroom, I think Luminar did a pretty good job here. At first it made the water look a little uneven, but it only took a few more strokes to get a more natural look.
Before…

After…

I think if you pixel peep, you’ll notice something has changed, but fully zoomed out, it’s hard to tell if an object was removed. I’d say it’s great for small objects, but larger objects will certainly struggle.

Editing Portraits on Luminar Mobile
If you’re a hobbyist or perhaps a content creator, then it’s likely you take a lot of portraits when out in everyday life. With that in mind, I chose to edit the portraits I made on my iPhone 13, to show that you can still get great results with an old pocket device, and to see if Luminar Mobile could assist with that.
Unedited iPhone 13 image shot in portrait mode…

Dedicated Portrait Tools

Baked into the software is a dedicated portraits tab, packed with tools designed to help you enhance your portraiture. There’s an AI-powered Bokeh AI tool, blemish and shine removal, plus a face light tool which lets you adjust exposure on the face without impacting the rest of the shot. Perhaps controversially, there are face and body slimming tools as well.
To edit my shot, I dived into the filters available, to see what they could do. They’re more like lite LUTs, and they look like rolls of film, though don’t expect a like-for-like filmic look. From the 48 options available, I opted for Color-Punch Hot for this shot and reduced its intensity down to 45.
The photo with a filter applied…

The bokeh tool provided decent results and if used lightly it can create realistic looking separation between your subject and the background. Push it too far and it looks extremely artificial, but this is true for all AI-powered bokeh tools, as nothing compares to in-lens bokeh.
One thing I think the portrait tools are lacking is eye-masking features. Some tools to sharpen and brighten the eyes would be an excellent addition to Luminar Mobile’s workflow, similar to the kind you find on Skylum’s (the parent company of Luminar) dedicated portrait editing app, Aperty.
I found the blemish and shine reduction tools to be remarkably good, perhaps better than the same tools on the desktop app. Shine reduction was noticeable and blemish removal tidied up my skin without making me look like a melting cartoon. The face light tool was useful too and only required a small adjustment to get noticeable and useful results.
Photo with skin healing and masks applied…

Structure AI
Structure AI feels like a cross between clarity and sharpness, bringing out (or reducing) details within your photo. I specifically tested out this feature on a portrait to see if Luminar was able to hold up its promise: “It is also human-aware, so it doesn’t overprocess people in your images.”
It did a fine job of bringing out details in the background, or making the surrounding areas feel even softer. As you can see, I remain pretty unchanged, with only subtle differences when pushing Structure AI to its limits.
Luminar Mobile with Structure AI decreased (giving a softer look…)

Luminar Mobile with Structure AI increased (giving a sharper look…)

Final portrait edit…

Related: I Tested Dozens of Portrait Editing Apps: Why These 5 Are Worth It
My Real World User Experience
What I like about Luminar Mobile’s user interface is that it steps away from the traditional designs I’ve become accustomed to in the space of photo editing apps. It feels more like you’re playing a game, than going through the often cumbersome process of making your images more eye catching.
Haptic Feedback
I personally love the haptic feedback and sound effects (SFX). Not only do they feel and sound good, but they keep my brain engaged with the editing process, which is useful for when more refined details are needed. If you’re not a fan of haptic feedback and the SFX, you can turn them off in your user settings.

One limitation is you can’t edit in horizontal mode, unlike similar apps such as Photomator. Instead you’re stuck with vertical orientation. This is fine for the most part, but it means you have to share half your screen with the editing tools, which can cause viewing fatigue if you’re editing a portrait.

Using the curve tool in Luminar mobile.
The good news is that most of Luminar Mobile’s features can be fully optimized in a few clicks or moves of a slider, meaning more often than not you don’t need to spend ages looking at your screen to get a good edit.

I’m a fan of the squiggly contrast slider.
The app is responsive, and even tools like the tonal curve, which require more precision, were easy enough on my iPhone’s small form factor. As mentioned above, the only lag I experienced was when refining the Sky Replacement tool.
Exporting Images
If you’re editing images imported from your smartphone’s Photos app, you can save changes inside Luminar and they will be reflected in your photo stream. The best part is that edits are non-destructive, and even after saving an edit, you can revert back to the original should you wish to take your style down a different path.

You can adapt export quality, and export in JPEG, PNG, TIFF and HEIF.
How Much Does Luminar Mobile Cost?
Luminar offers three pricing options: weekly, annually or with a one time single purchase for lifetime ownership.
- Weekly: $6.99
- Annually: $29.99
- Lifetime: $49.99
Lifetime undoubtedly offers the best value. And I think it’s certainly worth the cost if you want something far more powerful than your stock photo editing app on your smartphone.
Alternatively, if you choose to delve into the Luminar ecosystem, editing on both desktop and mobile, you can purchase a perpetual cross platform license, which costs $159.
The Verdict
I think Luminar Mobile is an enjoyable photo editing app that can push your photos to the next level. I’m digging many of its tools because of how simple they are to use, and more advanced features like the Light Depth tool feel genuinely useful rather than being a gimmick.
The performance issues are minor, and likely less noticeable on new smartphone devices.
I’d say if you’re a dedicated smartphone photographer or someone who likes to do some editing on the move, without needing to take a laptop, then Luminar Mobile is well worth the investment. Its low price point also means it’s pretty much risk free if you decide to switch to another app. There’s a seven-day free trial too.
As far as photo editing apps for iOS and Android go, Luminar Mobile is up there with the best, and in some use cases even better than the likes of Photomator, VSCO and Snapseed. For that reason I’m giving it 4 out of 5 stars.
More reading: ON1 Photo RAW Review: What 9 Months of Testing Taught Me
Read our Affiliate Statement.